
Video Directions from your Teacher
View instructions from your teacher to complete the Animal Project Poster.
Directions: We will be using the skills you developed in the Word Processing unit to create an educational animal poster that uses Microsoft Word 2007 drawing tools including: customized Word Art, shapes, line tools, fill color, fill patterns, images, and color.
Getting Ready
To-Do:
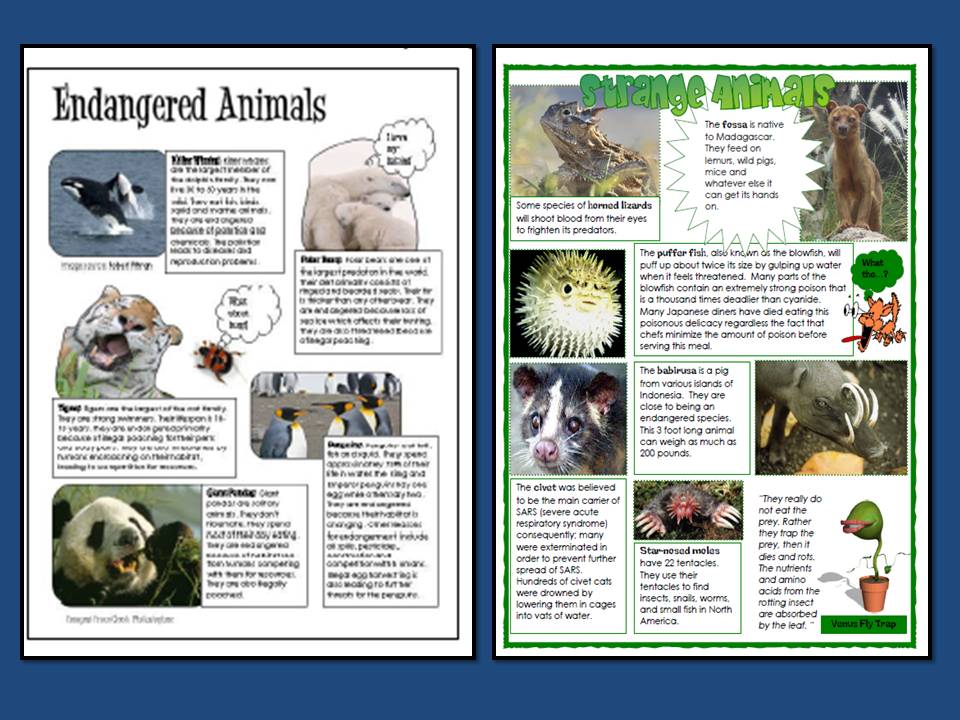
1. View the project sample image, read through and examine the two sample posters to get a good idea of the type of project you will be creating.
2. You will need to brainstorm and choose a topic for your project. Topics can include: endangered animals, strange animals, nocturnal animals, flying animals, marsupial animals. If you have an idea for a different animal topic - please see your teacher to get approval.
3. Download the Animal Poster Rubric. This is what will be used to grade your final project. Read through the grading rubric to get a good idea of the requirements of the project. You can print a copy of the grading rubric, if you did not receive one in class. If you need to print, send it to the Xerox (color) printer.
Online research

4. Create a project folder - Double click on "My Computer" on your computer desktop. Double-click on your student (your name) drive. Select File, New Folder. Change the name of the folder from "new folder" to animal poster. You should now have a folder on your student drive called animal poster. You will save all files for this project inside this folder to keep things organized.

5. Download the research worksheet to complete your animal research. When you download your file, save it on to your student (your name) drive in the animal poster folder.
6. Open your research worksheet and Internet Explorer. Use the websites Boolify to help you put together your search terms. You will use your web research skills to locate information using a search engine (Google, etc.) and search terms (+, -, " ") on your chosen animal topic.
Fill in your research worksheet. DO NOT use copy/paste text from the Internet or from the sample project images. You must read and type the information in your own words.
Once you have completed your animal research, have your teacher check your work on your computer screen.
Microsoft Word - Animal Poster Project
7. Download the Creating Posters handout to help your create your poster. You can save this handout in your student drive in the animal poster folder.
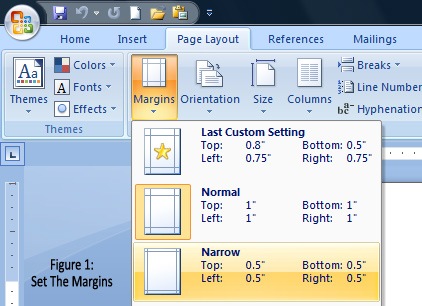
8. Open Microsoft Word and a blank document. On the page layout tab - set the margin stye to narrow.
9. Save the document with an appropriate title (ex. endangered animal) in the animal poster folder on your drive.
10. Open your Microsoft Word poster document. Use the Creating Posters handout to complete steps #1-13 to add customized WordArt to your poster document.
11. Open your Microsoft Word poster document. Use the Creating Posters handout to complete steps #14-17 to locate images to use in your poster document. Open Internet Explorer and visit the Google homepage. Click on images on the top. You will use your web research skills and search terms to locate a minimum of 8 images to use with your poster. Make sure the images are appropriate to your poster topic. Save all images in your student drive in the animal poster folder.

12. Open your Microsoft Word poster document. Use the Creating Posters handout to complete steps #18-32 to add images and format the images in your poster document.
13. Open your Microsoft Word poster document. Use the Creating Posters handout to complete steps #33-35 to add text from your research worksheet to your poster document.
14 Open your Microsoft Word poster document. Use the Creating Posters handout to complete steps #36-40 to finalize the design and layout of your poster document. Make sure that there are no blank white areas. Make sure there is a good balance of text and images. Make sure that your images are clear and not fuzzy or distorted. Make sure that all your font is clear and readable.
15. Take out your grading rubric for the project. Go through each section to make sure that you have met all the requirements and will earn maximum points. Print Preview your final poster to make sure that it will all fit on one page.
Have your teacher review the print preview of your poster and sign your grading rubric.
16. Use your grading rubric to complete the final checklist to turn in your animal poster project.

