Creating the avatar flyer: Microsoft word
Video instructions from your teacher
View instructions from your teacher to demonstrate
information and tips to complete the Project.
information and tips to complete the Project.
Getting Ready
You will need a picture of yourself saved on your student (your name) drive in order to complete this activity.
View the grading rubric for this project to review the requirements for this assignment. The grading rubric will be passed out in class, if you need another copy you may print one.
You will need access to the Internet and Microsoft Word to complete this project.
View the grading rubric for this project to review the requirements for this assignment. The grading rubric will be passed out in class, if you need another copy you may print one.
You will need access to the Internet and Microsoft Word to complete this project.
Creating the Flyer

1. Open Microsoft Word: Click on Start - Programs - Microsoft Office - Word
2. Click on the "Page Layout" tab, select "Margins" and "Narrow"
2. Click on the "Page Layout" tab, select "Margins" and "Narrow"

3. Save the file on your student (your name drive) with the filename - Avatar Flyer

4. You will need to use the insert tab to insert your Photograph – the digital image of yourself that is saved on your student (your name) drive. Deselect (click off of the image) and repeat the process use the insert tab to insert your Avatar Image.

5. Click the hyperlink to view the help sheet - Clip Art and Word Art Help Sheet to help you complete your project.
Use your back button on the Internet Explorer browser to get back to this page.
6. You will need to select each image and use the picture tools to change the text wrapping to "Square" to work with the layout of your images.
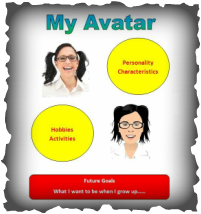
7. Use the image below to help you complete your flyer using Word Art and Clip Art. Set ALL Word Art and Clip Art to square text wrapping. This will allow you to move the items around on your flyer.
Your flyer should match the sample - make sure that the location and size of all images, word art and clip art match the sample as closely as possible. You are only substituting your information. Make good use of your space.
Use your back button on the Internet Explorer browser to get back to this page.
6. You will need to select each image and use the picture tools to change the text wrapping to "Square" to work with the layout of your images.
7. Use the image below to help you complete your flyer using Word Art and Clip Art. Set ALL Word Art and Clip Art to square text wrapping. This will allow you to move the items around on your flyer.
Your flyer should match the sample - make sure that the location and size of all images, word art and clip art match the sample as closely as possible. You are only substituting your information. Make good use of your space.

8. Visit the bulletin board to review the sample finished project and grading checklist.
9. When you are happy with your flyer - make sure to do a print preview. Select the Office button - Print - Print Preview option. This is how your flyer will look if printed.
Complete your checkpoint to have your teacher review your work on your computer screen.
9. When you are happy with your flyer - make sure to do a print preview. Select the Office button - Print - Print Preview option. This is how your flyer will look if printed.
Complete your checkpoint to have your teacher review your work on your computer screen.

